
Technics SL1200/1210, the turntable of choice for all DJ. Or is it?
Well in my opinion, it is not a very nice turntable to play on. I particularly do not like the border of the plate as this make altering the speed of the record feeling awkward. It is quite an old turntable and design, so I am missing connectors for power as well as audio. It does not have a Line- nor a digital output. The Motor is strong, but not as strong as on my Numark TT-500, and I clearly notice it. So, my favourite pick of turntable, it is something else than the Technics Classic. But, the Numark turntable has been doing a great job now for 13 Years.
Recently though, I noticed a market have emerged for customising the old beast, and I got quite curious, intrigued even. So I set on a journey to put together my own custom build Technics SL1200/1210. Mine is based on the SL1200mk2, which is shown in the featured image (the SL1210mk2 is the matte black version).
I cued the music about 18 months ago. But it has been more of an on/off kind of project, so it is possible to finish this kind of a project in a couple of (or a few) weeks. It all depends on part availability, delivery times and your own practical ability.
So let me give you the run-down of the project.
Already from the start I knew I wanted do a paint job. I had a couple of ideas, but it all ended up in a clean design with a metallic black body. The platter was cleaned and painted in that same black, but keeping some aluminium details. The short version is I ended up going for the Metallic black, Matte black and Aluminium scheme. I also wanted to play around a little with LEDs and completely change the tonearm. The gallery below shows some detailed images from the last half phase of the project (including the finished turntable).
[UGML id=1211]
As you can see, it is the same turntable, but different. I did the following changes/upgrades:
- 45 rpm turntable adaptor hole was removed
- Repainted to black metallic (body and platter) with aluminium (armboard, platter and pickup light) and matte black (Buttons, pickup light tube and pitch knob) details.
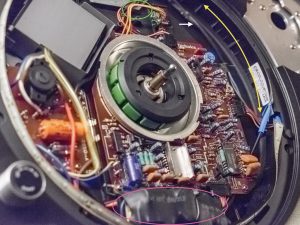
- A box for audio output and power chord was build, painted and mounted on the underside of the player. The white arrow in the image below shows the re-routed power wires. Audio connectors are high quality gold plated for Photo output. The box is prepared for a future digital output.
- Blue fabric covered power chord with black connectors and a ferrite against transients.
- Led colours were changed to blue (platter illumination- and 33/45 buttons).
- Pitch zero LED colour change to red.
- Pickup illumination was changed to a blue LED instead of a old-fashioned lamp (warm white). An extra voltage regulator had to be installed for this. Hardly in frame, but circled green in the image below.
- Blue platter and picth illumination was installed for this cool halo effect. The voltage regulator for this is shown circled in purple in the image below. The LED-list is marked with the yellow arrow.
- The mk2-version power switch was removed and a mk3D-version was installed. This version has a recessed power knob and required some alterations to be fitted.
- The buttons and pitch knob were replaced by matt black power coated versions.
- Black pitch label
- The centre click was removed on the pitch fader.
- An aluminium armboard for a three mount Rega Tonearm was installed.
- New Rega RB220 installed.
You see in the images that I use:
- a Shure M44-7 Pickup.
- Mastersounds vinyl weight.
I initially did not have the ferrite on the power chord, but noticed clicks on the output signal, that were not due the records that were being played. I suspected this to come from outside via the power chord, cross talking onto the audio signal. My hope was that the ferrite would fix this problem, which it did. The unit now works beautifully, with a nice and clear sound output. I am very happy with the results.
I have two things I have planned for the future though:
- I want to have a S/PDIF output
- I want to switch the feet to Isonoe Audio Isolation System.
Check out the following links if you are thinking of customising your own player:
Hope you enjoyed the read and like the looks of this turntable. If you have questions and comments, head down to the comments section below.